GoogleContactsEventsNotifier
Translation
Google Contacts Events Notifier can easily be configured so as to use another
language instead of English (which is the default) for the email
notifications.
This guide presents the main points of the translation process.
Add a translation
If you want to add a new translation of the notifications, open your script,
find the line reading var i18n and have a look at the structure of the
translation object and at the instructions at the end.
The main idea is to build a little “dictionary” for each language to match the
English string with its translation in the given language.
To add a new language (e.g. Spanish - language code ‘es’):
-
Find the block of code which represents one existing translation and copy it, for example:
'it': { 'Age': 'Età', ... 'You can find the latest one here': 'Puoi trovare l\'ultima qui', }, -
Paste it inside the list of translations respecting the alphabetical order for the language codes (in this case the new language code will be ‘es’, so we will put the new translation between ‘de’ and ‘fr’):
'de': { 'Age': 'Alter', ... 'You can find the latest one here': 'Du findest die neuste Version hier', }, 'it': { 'Age': 'Età', ... 'You can find the latest one here': 'Puoi trovare l\'ultima qui', }, 'fr': { 'Age': 'Age', ... 'You can find the latest one here': 'Vous pouvez trouver la dernière version ici', }, -
Change the language code and remove all the copied translations on the right hand side:
'de': { 'Age': 'Alter', ... 'You can find the latest one here': 'Du findest die neuste Version hier', }, 'es': { 'Age': '', ... 'You can find the latest one here': '', }, 'fr': { 'Age': 'Age', ... 'You can find the latest one here': 'Vous pouvez trouver la dernière version ici', }, -
Proceed to translate every item in the list, leaving the string on the left of the
:unchanged and translating the one on the right, like this:'de': { 'Age': 'Alter', ... 'You can find the latest one here': 'Du findest die neuste Version hier', }, 'es': { 'Age': 'Edad', ... 'You can find the latest one here': 'Puedes encontrar la última aquí', }, 'fr': { 'Age': 'Age', ... 'You can find the latest one here': 'Vous pouvez trouver la dernière version ici', }, -
These are some things you have to keep in mind to do this correctly:
- Remember to put a comma at the end of each line except after the open curly bracket.
- Do not change the leftmost string.
- Make sure that the strings are enclosed in a pair of single quotes (
'). - If you need to enter a single quote in the string itself put a backslash
(
\) before it.
You can find an example above: the stringPuoi trovare l'ultima quimust become'Puoi trovare l\'ultima qui'when enclosing it between the two single quotes. - Strings such as
'dd-MM-yyyy'must not be translated or changed into other alphabets: instead they can be used to change date formats in the language you are translating into (e.g. a ‘en-US’ translation would use'MM-dd-yyyy'to display the date as month-day-year). - Try to keep the translation as faithful to the original as possible (obviously
keeping context and language rules in mind).
If you have any doubt you can open an issue asking for help.
Share your translation
Google Contacts Events Notifier is used by various users from around the world; if you want you can make your translation available to everyone by sharing it with us: we will be extremely happy to include it in the script in the next release.
How to submit a new translation
Do you know your way around git and GitHub very well?
Then go to “Translation via git”.
You don’t know what we are talking about?
Not a problem: you can follow the “Translation via web”
guide.
You really cannot make your way around this whole “edit, comment and submit”
thing, but still would like to contribute in one way or another?
We have the right solution for you: the “Translation via issue”.
If you don’t know what git and GitHub are, but want to learn more about it you can read this guide written by a collaborator of this project.
Translation via git
Follow this guide only if you are quite familiar with how git and GitHub work.
- Fork this repository.
- Clone the forked repository on your computer.
- Edit the script to include your translation and commit the changes.
- Push the commit(s) to your forked repository and open a new Pull Request for
the changes to be merged into the original repository.
Note: PRs should not be opened against themasterbranch, but againstdevelopment(or another feature branch if appropriate).
You might want to read the complete guide to contributing: most of it is not needed if you just want to contribute with a translation, but you still might find some of the info quite useful for contributing further.
Translation via web
Follow this guide if you are able to edit text files on the fly on the web.
First of all you will need to create a fork of this repository. A fork is a copy of the project that you can work on (editing, adding and deleting files for example). Once you are done working on the fork you will send those edits to us and we will analyze and merge them into the actual code of the script.
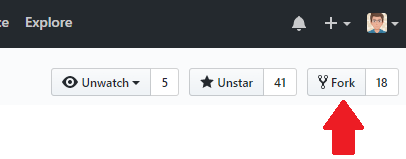
- To create the fork open the main page of the project and
click on “Fork” in the top right corner.
From now on you can open your fork by visiting the following URL:https://github.com/YOURUSERNAME/GoogleContactsEventsNotifier. - Open your fork and choose the branch you want to edit from the dropdown menu.
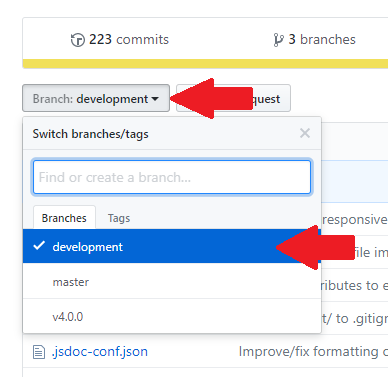
Note: Almost always this should bedevelopment(unless it’s clearly stated otherwise somewhere). - Open the file you want to edit (clicking on its name) and click on the pencil
button in the top right corner to edit it.
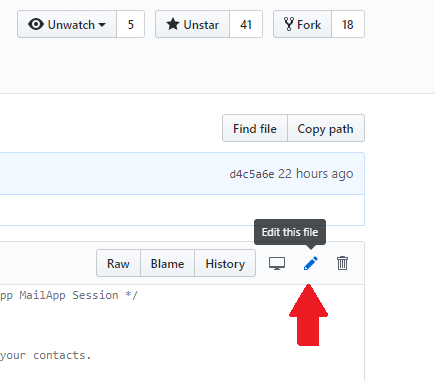
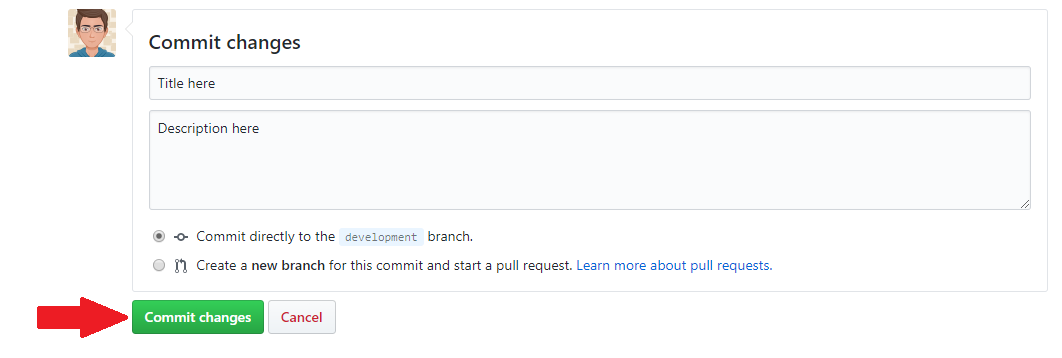
You can modify the file in the browser directly or you can copy the file content in your editor of choice on your PC, edit it there, then copy the edited text and paste it in back in the browser. - Once you are done add a title and a description to your edit (Something along
the lines of “Added translation for XX” is fine) and click on “Commit
changes”.
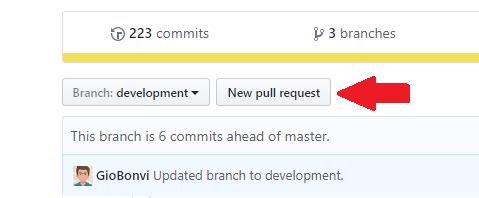
- Get back to your fork home page and verify that the changes have been saved
correctly. (You might have to select the branch again). Then click on the
“New pull request” button next to the branch selection dropdown.
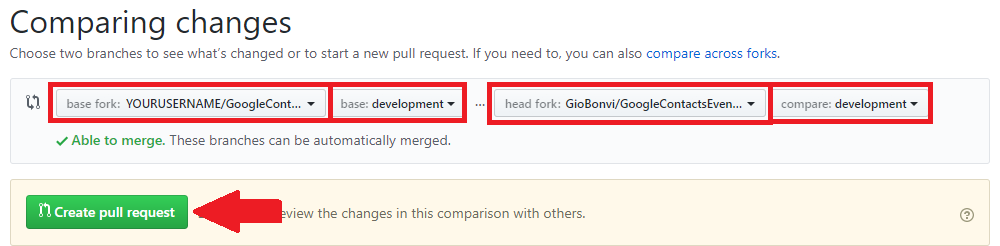
- Set the “base fork” dropdown to your own fork and the “head fork” to
“GioBonvi/GoogleContactsEventsNotifier”. Set both the “base” and “compare”
dropdowns to the branch you have edited, then click “Create pull request”.
- This is it. Your request will now be analyzed and eventually approved by one of the collaborators of the project.
Translation via issue
Use this method only if you have tried the previous one and you are completely lost somewhere in the GitHub labyrinth.
- Go to the issue page, click on “New issue”.
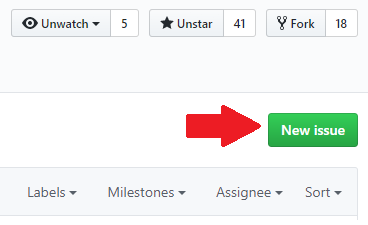
- Give the issue a meaningful title (e.g. “Translation for XX language”).
- Delete all the pre-compiled text and paste the new translation (just the translation, not the full script), then click on “Submit new issue”.
- This is it. Your request will now be analyzed and eventually approved by one of the collaborators of the project.